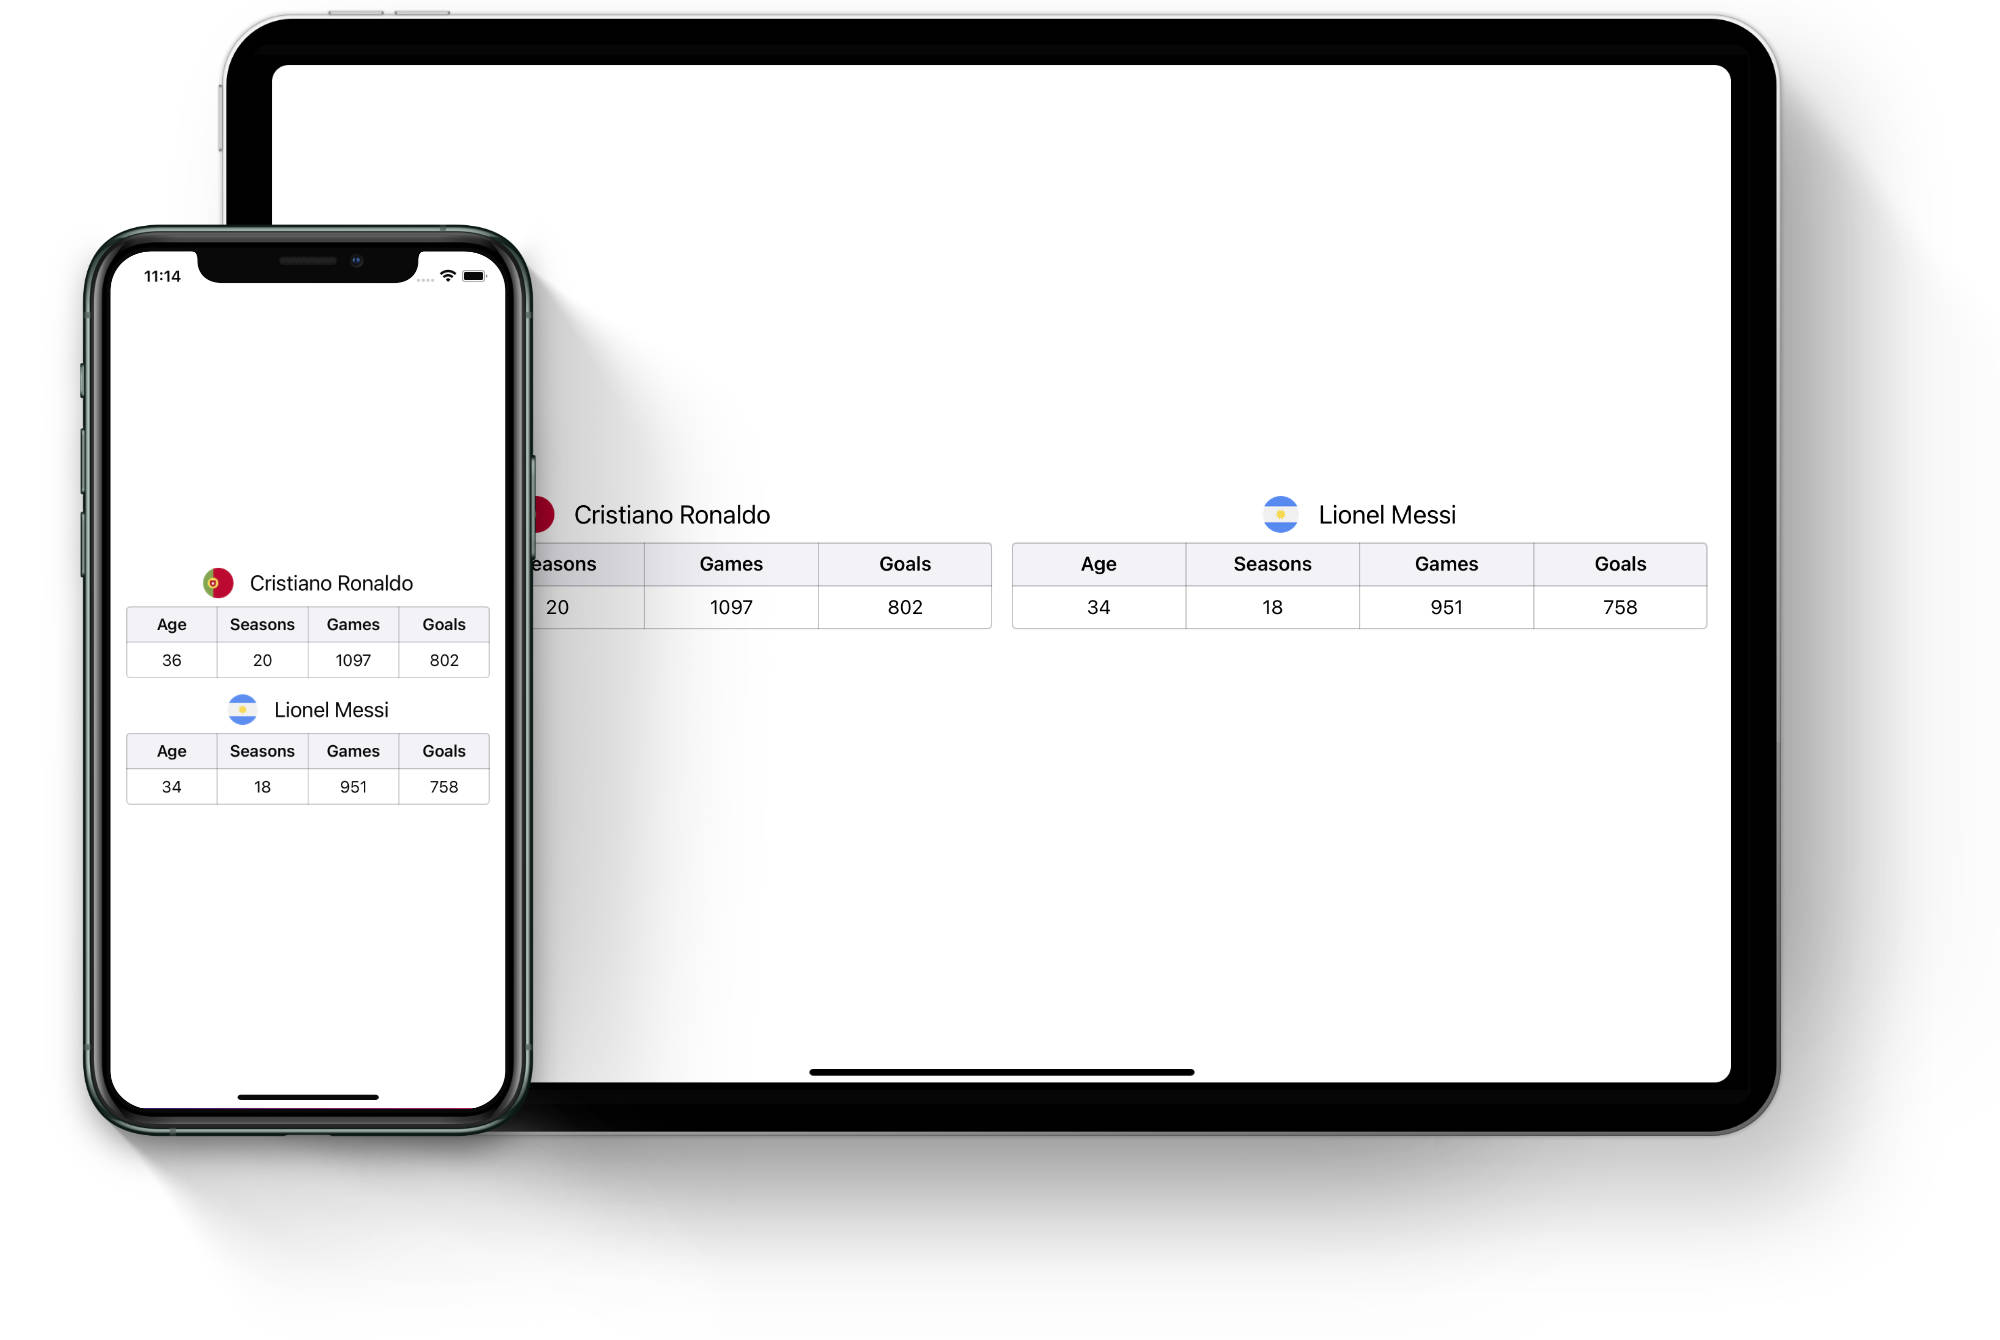
In this example we are going to build a simple view to display some basic information about a football (soccer) player. We’ll look at how we can nest stack views, use stack view layout margins and react to size changes of the view controller to update our layout with a more fine–grained approach when size classes are not enough.
Overview
The player profile view is a vertical stack that contains a header and a boxed content view. The header itself is a horizontal stack view. The content uses a horizontal stack to arrange multiple vertical stack views. Phew, quite a stackception! Let’s see how it’s done.
Create a new iOS project in Xcode or open the starting project for this example, it is available on GitHub.
View model
Let’s define some view models first. In a new file Models.swift we’ll create a view model for the single title/value view:
import UIKit

enum TitledValue {
    struct ViewModel {
        let title: String
        let value: String
    }
}
Then a view model for the entire player’s profile view that contains the player’s name and country image, along with a list of values:
enum PlayerProfile {
    struct ViewModel {
        let country: UIImage?
        let name: String
        let values: [TitledValue.ViewModel]
    }
}
Finally we create a sample model with two famous football players:
enum SampleModel {
    static let player1: PlayerProfile.ViewModel = PlayerProfile.ViewModel(country: UIImage(named: "portugal"), name: "Cristiano Ronaldo", values: [
        TitledValue.ViewModel(title: "Age", value: "36"),
        TitledValue.ViewModel(title: "Seasons", value: "20"),
        TitledValue.ViewModel(title: "Games", value: "1097"),
        TitledValue.ViewModel(title: "Goals", value: "802")
    ])

    static let player2: PlayerProfile.ViewModel = PlayerProfile.ViewModel(country: UIImage(named: "argentina"), name: "Lionel Messi", values: [
        TitledValue.ViewModel(title: "Age", value: "34"),
        TitledValue.ViewModel(title: "Seasons", value: "18"),
        TitledValue.ViewModel(title: "Games", value: "951"),
        TitledValue.ViewModel(title: "Goals", value: "758")
    ])
}
Titled value view
To build a more complex view, it’s often a good idea to break it down into smaller subviews. In our case the profile view is composed of multiple smaller views, here’s the breakdown:
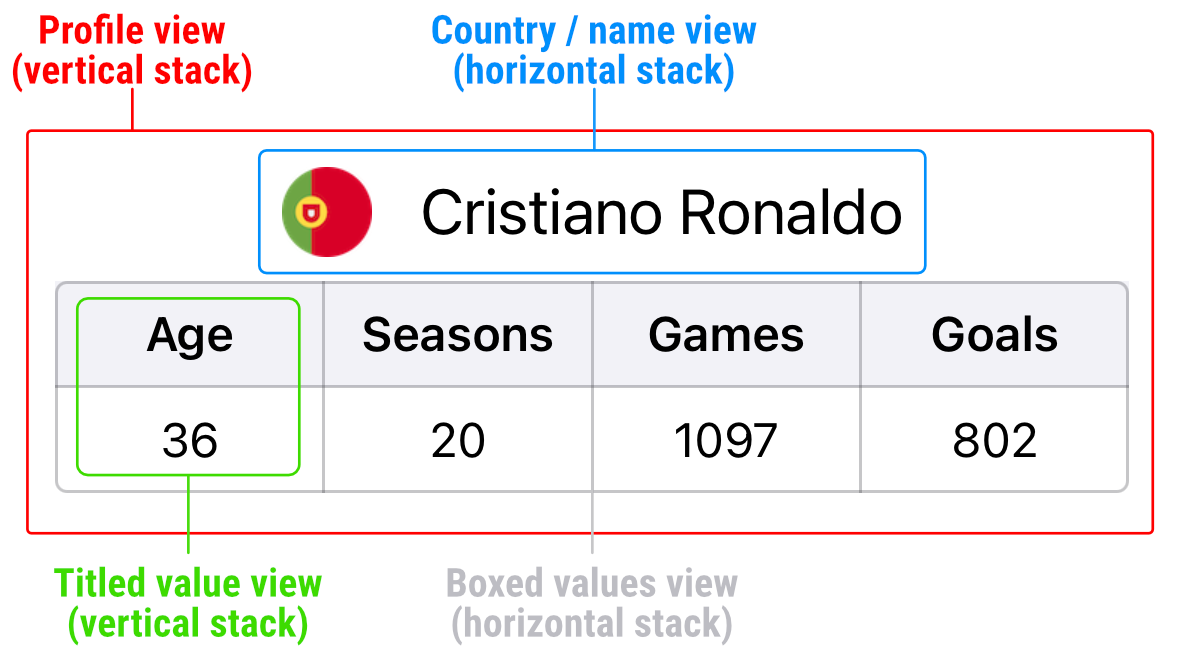
We’ll start with the view that’s deepest in the hierarchy — the titled value view. It’s a simple stack view with a title and value labels. Additionally it contains a distinct background for the title and a horizontal border through the middle.
Let’s create a new subclass of UIStackView:
class TitledValueView: UIStackView {

    init() {
        super.init(frame: .zero)

        self.setupView()
    }

    required init(coder: NSCoder) {
        fatalError("init(coder:) has not been implemented")
    }

    private func setupView() {

    }

}
We add a title and value labels as member variables to be able to update the view whenever we want:
class TitledValueView: UIStackView {

    private let titleLabel: UILabel = UILabel()
    private let valueLabel: UILabel = UILabel()

    ...

}
In the setupView method we first initialize the stack view’s properties like the axis, spacing and also add some margins:
private func setupView() {
self.axis = .vertical
self.spacing = 16
self.directionalLayoutMargins = NSDirectionalEdgeInsets(top: 8, leading: 8, bottom: 8, trailing: 8)
self.isLayoutMarginsRelativeArrangement = true
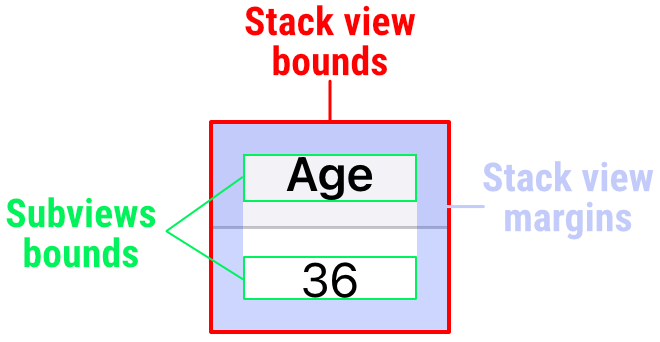
}When we add margins to a stack view and enable the isLayoutMarginsRelativeArrangement property, the stack view will automatically add spacing between the arranged subviews and its bounds:
Before we add any of the labels, we want to create the background view first to make it appear behind the labels. Note we add the background using the addSubview method, not addArrangedSubview. This way we can manually constrain the background without affecting the stack’s layout:
private func setupView() {
    ...

    let backgroundView = UIView()
    backgroundView.translatesAutoresizingMaskIntoConstraints = false
    backgroundView.backgroundColor = .secondarySystemBackground
    self.addSubview(backgroundView)

    NSLayoutConstraint.activate([
        backgroundView.leadingAnchor.constraint(equalTo: self.leadingAnchor), // (1)
        backgroundView.trailingAnchor.constraint(equalTo: self.trailingAnchor), // (1)
        backgroundView.topAnchor.constraint(equalTo: self.topAnchor), // (1)
        backgroundView.heightAnchor.constraint(equalTo: self.heightAnchor, multiplier: 0.5) // (2)
    ])
}- The leading, trailing and top anchors are pinned to the matching anchors of the stack view. This way the background starts at the top and spans across the entire width of the stack.
- The height is set to half of the stack view. This in combination with the other constraints will make the background cover the entire top half of the stack.
Next we add the border view separating the title and value labels. Once again the view is added using the addSubview method so that we can manually set its layout:
private func setupView() {
    ...

    let borderView = UIView()
    borderView.translatesAutoresizingMaskIntoConstraints = false
    borderView.backgroundColor = .separator
    self.addSubview(borderView)

    NSLayoutConstraint.activate([
        borderView.centerXAnchor.constraint(equalTo: self.centerXAnchor), // (1)
        borderView.centerYAnchor.constraint(equalTo: self.centerYAnchor), // (1)
        borderView.widthAnchor.constraint(equalTo: self.widthAnchor), // (2)
        borderView.heightAnchor.constraint(equalToConstant: 1) // (3)
    ])
}- Both the horizontal and vertical centers match that of the stack view.
- The width is set to match the stack view as well.
- The height is set to constant of
1, creating a nice horizontal line.
Finally we get to create the labels. We set their text alignment to center since the stack view will size them automatically to full width. In case the text within the labels gets longer than the available width we allow for the font to made smaller:
private func setupView() {
    ...

    // Title label
    self.titleLabel.font = UIFont.preferredFont(forTextStyle: .headline)
    self.titleLabel.textAlignment = .center
    self.titleLabel.minimumScaleFactor = 0.5
    self.titleLabel.adjustsFontSizeToFitWidth = true
    self.addArrangedSubview(self.titleLabel)

    // Value label
    self.valueLabel.font = UIFont.preferredFont(forTextStyle: .body)
    self.valueLabel.textAlignment = .center
    self.valueLabel.minimumScaleFactor = 0.5
    self.valueLabel.adjustsFontSizeToFitWidth = true
    self.addArrangedSubview(self.valueLabel)
}
Lastly we create an update method to be able to update the view with our view model:
func update(viewModel: TitledValue.ViewModel) {
    self.titleLabel.text = viewModel.title
    self.valueLabel.text = viewModel.value
}
Boxed values view
We can now move on to another piece of the puzzle, the boxed value view that will make use of the TitledValueView and arrange those horizontally.
Start by creating a new file BoxedValuesView.swift and adding a subclass of UIView:
class BoxedValuesView: UIView {

    init() {
        super.init(frame: .zero)

        self.setupView()
    }

    required init?(coder: NSCoder) {
        fatalError("init(coder:) has not been implemented")
    }

    private func setupView() {

    }
}
BoxedValuesView does not subclass UIStackView directly because we want to display a border around the view. Stack views support background colors, borders and other CALayer properties only since iOS 14.
Next we add the content stack view as a member property:
class BoxedValuesView: UIView {

    private let contentStackView = UIStackView()

    ...
}
In the setupView method we set the border style:
private func setupView() {
    self.translatesAutoresizingMaskIntoConstraints = false
    self.layer.borderWidth = 1
    self.layer.borderColor = UIColor.separator.cgColor
    self.layer.cornerRadius = 4
}
We then initialize the stack view and set its constraints. We use horizontal arrangement with equal sizing distribution to ensure all our titled value views have the same width. The constraints simply pin all of the stack view’s edges to the superview:
private func setupView() {
    ...

    self.contentStackView.axis = .horizontal
    self.contentStackView.distribution = .fillEqually
    self.contentStackView.translatesAutoresizingMaskIntoConstraints = false
    self.addSubview(self.contentStackView)

    NSLayoutConstraint.activate([
        self.contentStackView.leadingAnchor.constraint(equalTo: self.leadingAnchor),
        self.contentStackView.trailingAnchor.constraint(equalTo: self.trailingAnchor),
        self.contentStackView.topAnchor.constraint(equalTo: self.topAnchor),
        self.contentStackView.bottomAnchor.constraint(equalTo: self.bottomAnchor)
    ])
}
Now we can add an update method to have the stack refresh with our view model:
func update(viewModels: [TitledValue.ViewModel]) {
    // (1)
    for view in self.contentStackView.subviews {
        view.removeFromSuperview()
    }

    for (index, viewModel) in viewModels.enumerated() {
        // (2)
        let view = TitledValueView()
        view.update(viewModel: viewModel)
        self.contentStackView.addArrangedSubview(view)

        // (3)
        if index > 0 {
            let border = UIView()
            border.translatesAutoresizingMaskIntoConstraints = false
            border.backgroundColor = .separator
            self.contentStackView.addSubview(border)

            // (4)
            NSLayoutConstraint.activate([
                border.centerXAnchor.constraint(equalTo: view.leadingAnchor),
                border.widthAnchor.constraint(equalToConstant: 1),
                border.topAnchor.constraint(equalTo: self.contentStackView.topAnchor),
                border.bottomAnchor.constraint(equalTo: self.contentStackView.bottomAnchor)
            ])
        }
    }
}- We remove any existing views in the stack. Note we are using the
subviewsproperty, because the border view is not part of thearrangedSubviewsproperty (see below). - We loop over the view models, create
TitledValueViewfor each one and add it to the stack view as an arranged subview. - After the first view we also start adding a border to the left side of the view. Note the border must not be added as an arranged subview, but via the regular
addSubviewmethod. - The border has its horizontal center aligned with the leading edge of the titled value view. Its width is set to a constant of
1while top and bottom anchors are pinned to the stack view, creating a vertical border.
Country / name view
Next view is the header that displays the player’s country flag and name. In a new file CountryNameView.swift we add a subclass of UIStackView:
class CountryNameView: UIStackView {

    init() {
        super.init(frame: .zero)

        self.setupView()
    }

    required init(coder: NSCoder) {
        fatalError("init(coder:) has not been implemented")
    }

    private func setupView() {

    }

}
Then we add the image view and title label as member properties:
class CountryNameView: UIStackView {

    private let imageView = UIImageView()
    private let titleLabel = UILabel()

    ...

}
In the setupView method we initialize the stack view’s properties, this time we only need to set the axis and spacing:
private func setupView() {
    self.axis = .horizontal
    self.spacing = 16
}
The image view also doesn’t require lengthy setup and can be added directly to the stack view:
private func setupView() {
    ...

    self.imageView.contentMode = .scaleAspectFit
    self.addArrangedSubview(self.imageView)
}
For the title it’s important we adjust the content hugging and compression resistance priorities. We want stretch the label instead of the image to fill any available layout space. Similarly we want to avoid squeezing the image view so we lower the compression resistance for the label instead:
private func setupView() {
    ...

    self.titleLabel.font = UIFont.preferredFont(forTextStyle: .title2)
    self.titleLabel.setContentHuggingPriority(.defaultLow - 1, for: .horizontal)
    self.titleLabel.setContentCompressionResistancePriority(.defaultLow, for: .horizontal)
    self.titleLabel.adjustsFontSizeToFitWidth = true
    self.titleLabel.minimumScaleFactor = 0.5
    self.addArrangedSubview(self.titleLabel)
}
And that’s it! We just need to an update method and we are done:
func update(image: UIImage?, name: String) {
    self.imageView.image = image
    self.titleLabel.text = name
}
Player profile view
Now we need to put all these views together to compose our complete view. This view will contain the header and the boxed view and arrange them vertically. We create a new file PlayerProfileView.swift and add a new subclass of UIStackView.
class PlayerProfileView: UIStackView {

    init() {
        super.init(frame: .zero)

        self.setupView()
    }

    required init(coder: NSCoder) {
        fatalError("init(coder:) has not been implemented")
    }

    private func setupView() {

    }

}
We set the stack view’s properties, specifically the axis, spacing and alignment.
private func setupView() {
    self.axis = .vertical
    self.alignment = .center
    self.spacing = 8
}
Since the alignment is set to center, the stack view will not resize its arranged subviews automatically, instead it will keep them at their intrinsic size. However, we want the boxed view to fill the stack view fully so we’ll add the width constraint for that. As always we must not forget to add the view to the hierarchy first:
private func setupView() {
    ...

    self.addArrangedSubview(self.countryNameView)
    self.addArrangedSubview(self.boxView)

    self.boxView.widthAnchor.constraint(equalTo: self.widthAnchor).isActive = true
}
Once again we add an update method, this time accepting the PlayerProfile.ViewModel struct:
func update(viewModel: PlayerProfile.ViewModel) {
    self.countryNameView.update(image: viewModel.country, name: viewModel.name)
    self.boxView.update(viewModels: viewModel.values)
}
And that’s all there is to it! Now we can go back to the root view controller and add the view to the screen.
Displaying player profile views
We want to display a profile view for every view model we have and we’ll use another stack view to arrange the views. Back in the view controller file we add it as a member property:
class RootViewController: UIViewController {

    private let contentStackView = UIStackView()

    ...

}
We initialize the spacing and set the constraints in the viewDidLoad method. We are not setting the axis or distribution just yet, we’ll get to that in a moment:
override func viewDidLoad() {
    super.viewDidLoad()

    self.contentStackView.spacing = 16
    self.contentStackView.translatesAutoresizingMaskIntoConstraints = false
    self.view.addSubview(self.contentStackView)

    NSLayoutConstraint.activate([
        self.contentStackView.leadingAnchor.constraint(equalTo: self.view.layoutMarginsGuide.leadingAnchor), // (1)
        self.contentStackView.trailingAnchor.constraint(equalTo: self.view.layoutMarginsGuide.trailingAnchor), // (1)
        self.contentStackView.centerYAnchor.constraint(equalTo: self.view.layoutMarginsGuide.centerYAnchor) // (2)
    ])
}- The leading and trailing anchors are pinned to the layout margins guide of the view controller. This sets the horizontal position as well as the width of the stack view.
- The vertical center is aligned with the layout margins guide as well. The height of the stack is not constrained in any way in this example and is allowed to grow as much as it needs to.
After that we create the two profile views and add them to the stack view:
override func viewDidLoad() {
...
let player1View = PlayerProfileView()
player1View.update(viewModel: SampleModel.player1)
self.contentStackView.addArrangedSubview(player1View)
let player2View = PlayerProfileView()
player2View.update(viewModel: SampleModel.player2)
self.contentStackView.addArrangedSubview(player2View)
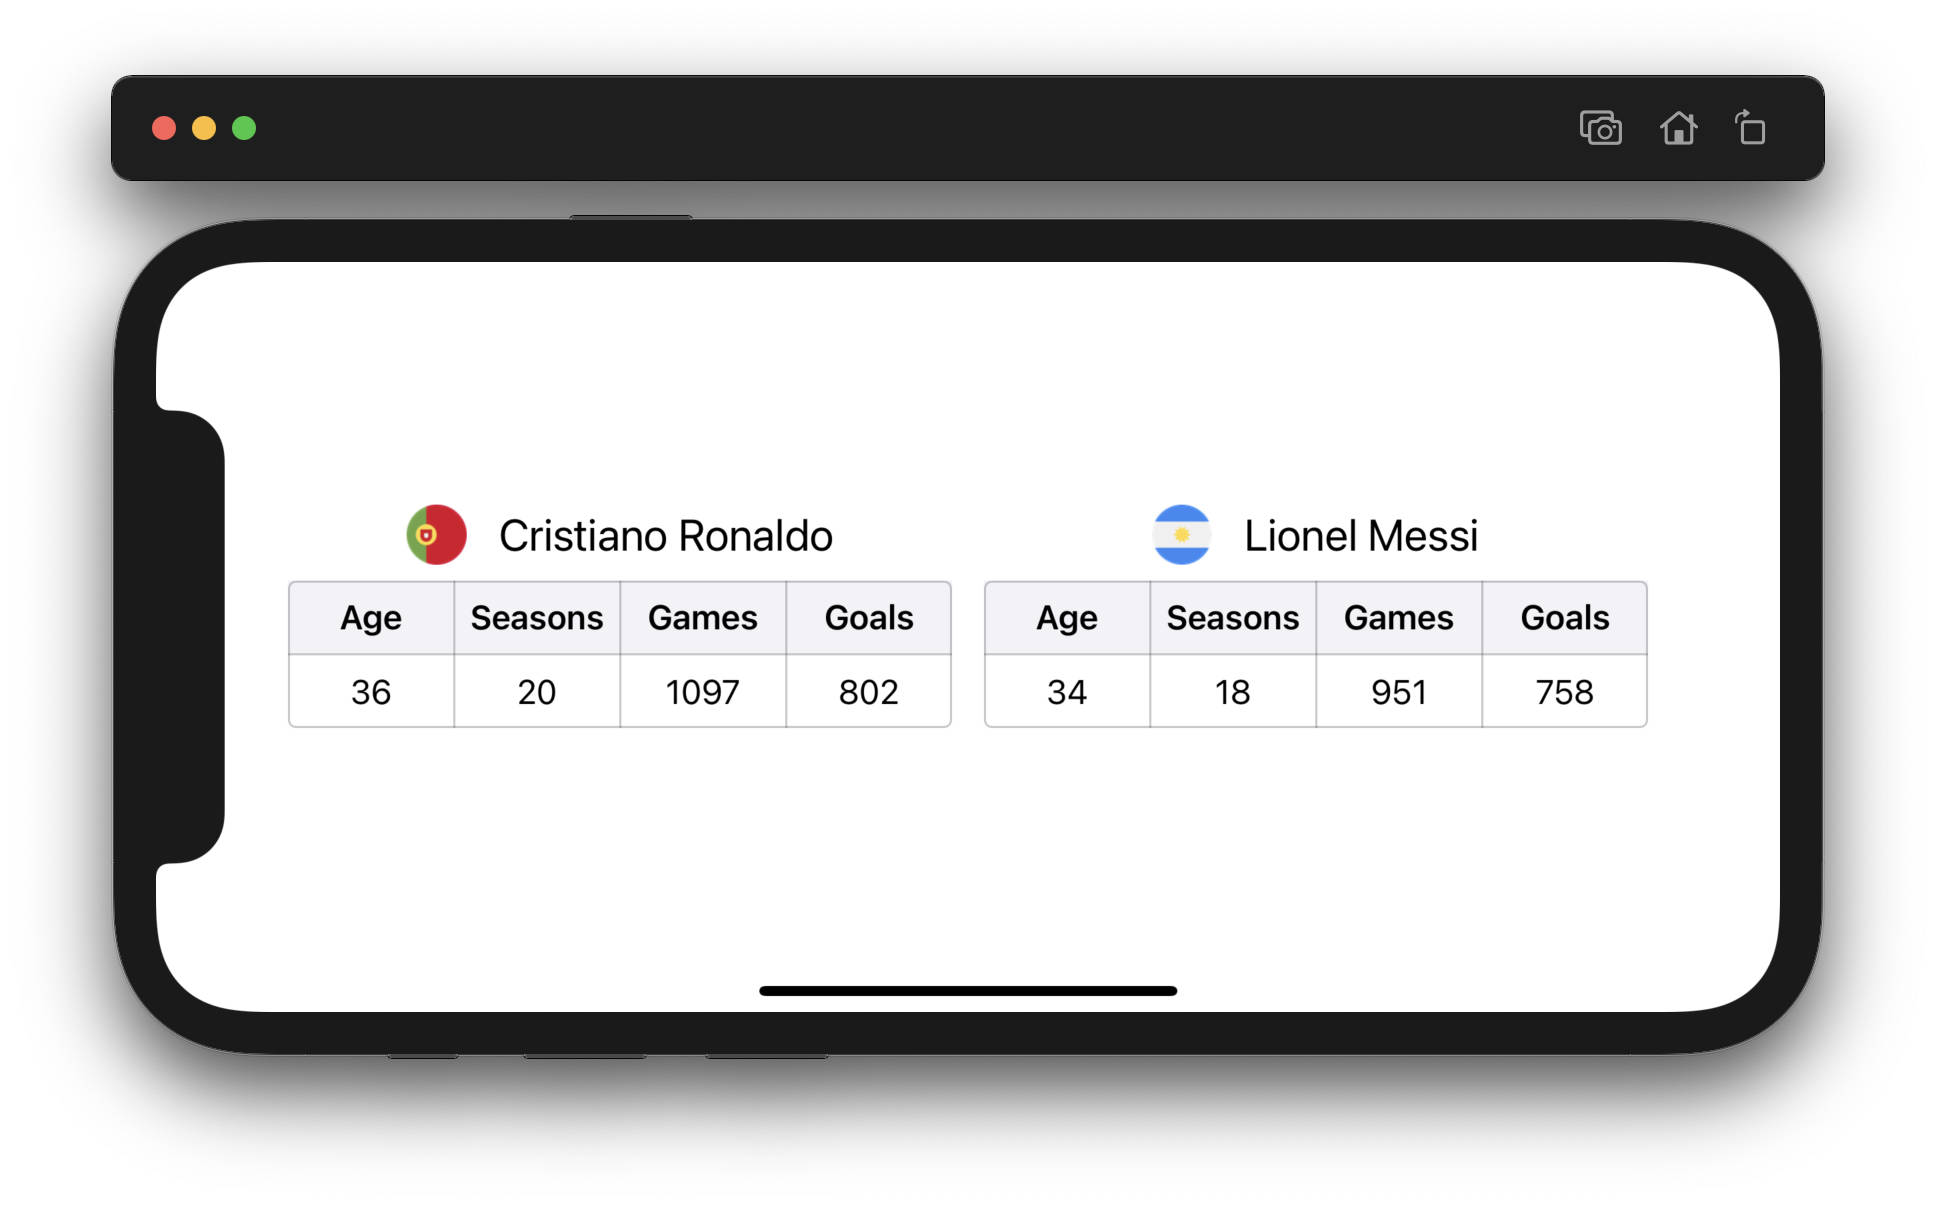
}Now imagine we want the two profile views arranged horizontally whenever there is enough horizontal space available to do so, otherwise they should be stacked vertically. How can we do that? Previously we used size classes which is the system’s way of saying "you either have a lot of space or not as much space available for your layout in the given dimension". While those work for most use cases and greatly simplify our layout code, sometimes we want more control. For example in this example we could still arrange the two profile views horizontally on smaller iPhones when holding them in landscape:
If we used size classes, some iPhones would report compact for the horizontal size class, indicating we have a limited space available. However we know what our layout looks like and want to do it our way. So instead of querying the current size class, we check the view controller’s size and decide on a threshold value (for the width) after which the content stack should arrange the views horizontally. For example, whenever the width of the view controller is more than 500 points use horizontal arrangement, otherwise stick to vertical.
Let’s create a new method in the view controller to describe this behavior:
private func setupView(for size: CGSize) {
    if size.width > 500 {
        self.contentStackView.axis = .horizontal
        self.contentStackView.distribution = .fillEqually
    } else {
        self.contentStackView.axis = .vertical
        self.contentStackView.distribution = .fill
    }
}
Whenever the provided size object reports 500 or more for the width, we set the axis to horizontal and apply equal sizing, otherwise we fallback to the vertical arrangement. All that’s left now is to call this method at some point. Luckily view controllers report any changes in the view’s size via the viewWillTransition(to:with:) method which we can override easily:
override func viewWillTransition(to size: CGSize, with coordinator: UIViewControllerTransitionCoordinator) {
    super.viewWillTransition(to: size, with: coordinator)

    self.setupView(for: size)
}
We use the provided size parameter and pass it over to our setupView method, changing our stack view’s orientation as needed. This handles any changes made to the size of the view controller (such as when the device orientation changes), however this method may not be called when the view controller is initialized and we need to address that.
It may sound like a good idea to call the setupView method from within the viewDidLoad method, however the size of the view controller’s view may not always be correctly set just yet (the view is still not part of the view hierarchy at this point) and we should not rely on its size here. Instead we need to wait for the view to become part of the view hierarchy. We can do that in multiple methods inside the view controller, one of them is viewWillLayoutSubviews. Since this method may be called multiple times during the lifecycle of the view controller, we should add a boolean flag to make sure the setupView method is only called once during the very first layout pass:
private var isInitialized: Bool = false

...

override func viewWillLayoutSubviews() {
    super.viewWillLayoutSubviews()

    if !self.isInitialized {
        self.isInitialized = true

        self.setupView(for: self.view.bounds.size)
    }
}
Here we can safely query the view’s size and call the setupView method to have the content stack initialized. Run the project to see the two views being arranged horizontally even on smaller phones!
Source code
Complete source code for this and all the other examples is available on GitHub.
Where to next
- Intro
- Basics, Part One
- Basics, Part Two
- Xcode Setup
- Sign Up Screen
- Stack Views
- Custom UIAlert
- Players Profile (reading now)
- Twitter Timeline
- Twitter Profile
- Music Album