Overview
Before we dive into more complex layouts, let’s take a look at a very helpful component — stack view. With UIStackView we are able to arrange our views in a horizontal or vertical stack with few or no constraints, making our code cleaner and easier to read while potentially cutting down on development time. In this post we’ll cover the most common stack view properties and then go back to our first example and rebuild it using stack views.
Properties
Axis
As mentioned, a stack view arranges its views in one of the directions — horizontal (default) or vertical. This is controlled by the axis property:
let stackView = UIStackView()
stackView.axis = .horizontal
// or
stackView.axis = .vertical
Distribution
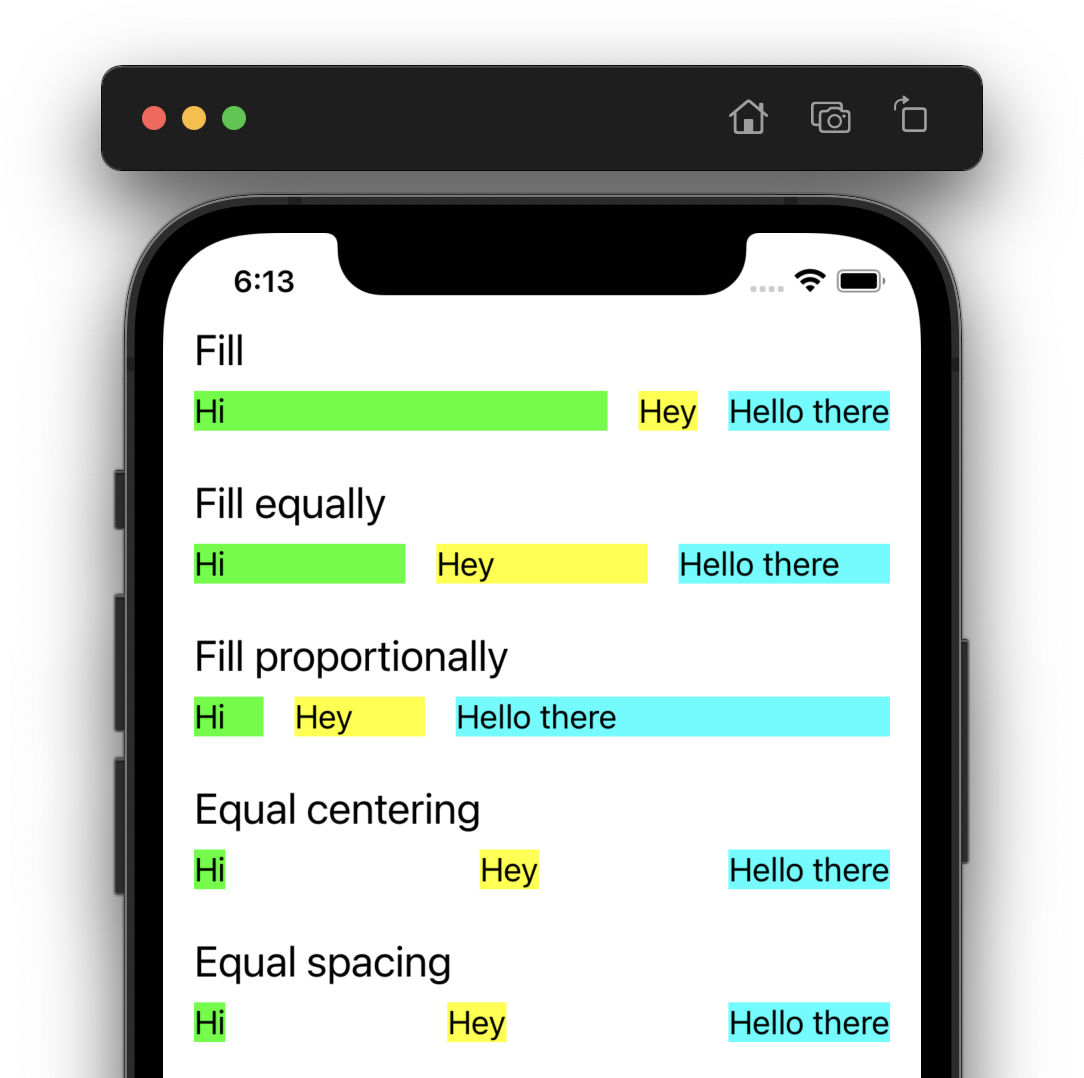
Distribution determines how the views are resized (if at all) and positioned along the stack view’s axis. There are five possible values, with fill and fillEqually arguably being the most used ones:
stackView.distribution = .fillEquallyfill— The stack view resizes its arranged views so that they fill the available space. When the arranged views do not fit within the stack view, it shrinks the views according to their compression resistance priority. If the arranged views do not fill the stack view, it stretches the views according to their hugging priority.fillEqually— The views are resized so that they are all the same size along the stack view’s axis and fill the available space.fillProportionally— The stack view resizes its arranged views so that they fill the available space. Views are resized proportionally based on their intrinsic content size.equalCentering— The stack view attempts to position the arranged views so that they have an equal center-to-center spacing. The views may be shrinked according to their compression resistance priority if they do not fit within the stack view.equalSpacing— The stack view positions its arranged views so that they fill the available space. When the arranged views do not fill the stack view, it pads the spacing between the views evenly. And if the views do not fit, they will be shrinked according to their compression resistance priority.
Alignment
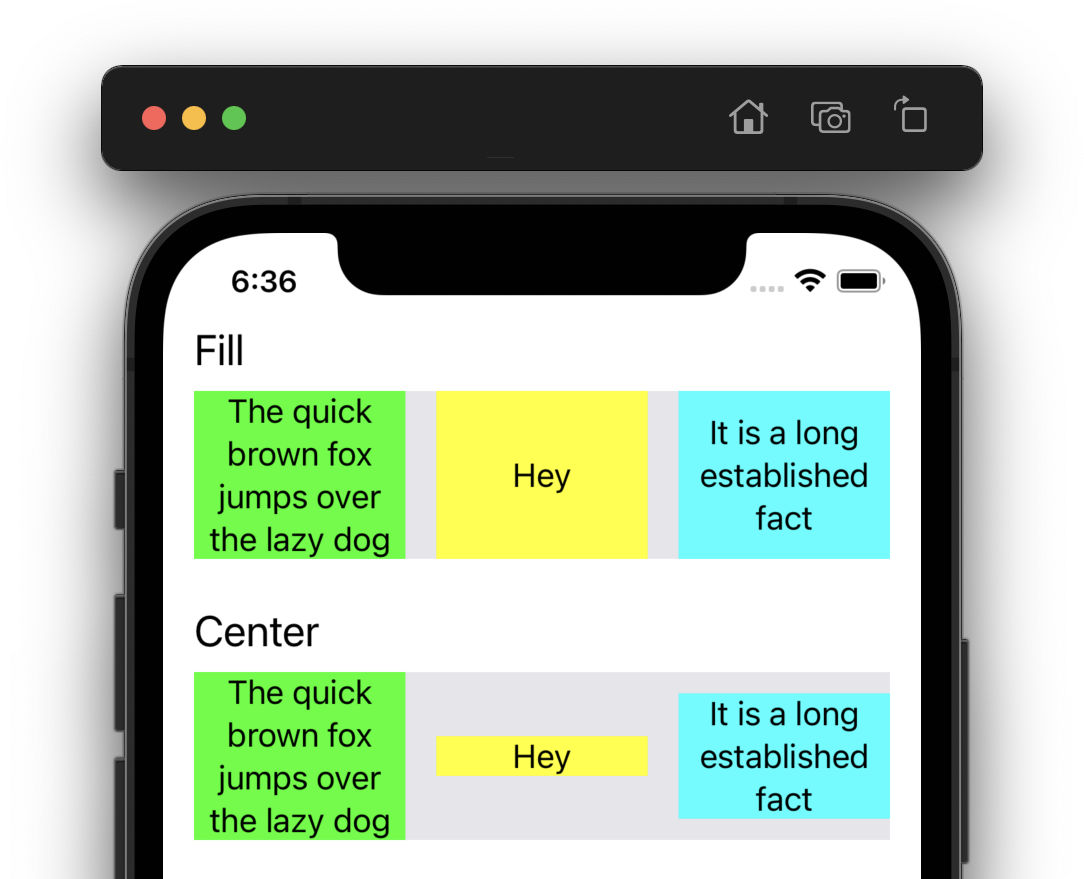
The aligment controls how the views are positioned and resized (if at all) on the axis perpendicular to the stack view axis. There are eight possible values, though not all of them work with both horizontal and vertical stack views:
stackView.alignment = .centerThe fill and center alignments work for both axis:
fill— The views are stretched or squeezed in order to fill the stack view.center— The views are aligned with the center of the stack view.
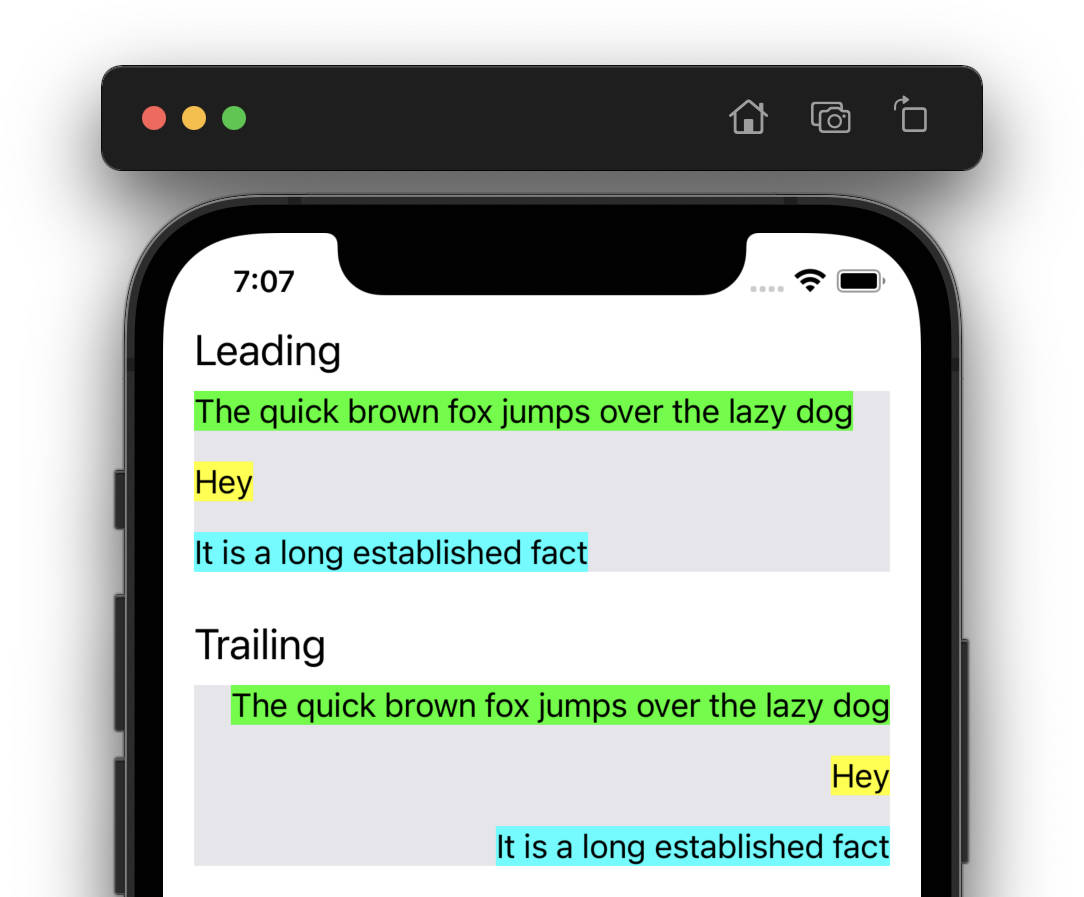
For vertical axis, we can use leading and trailing alignments:
leading— Aligns the views with the leading edge of the stack view.trailing— Aligns the views with the trailing edge of the stack view.
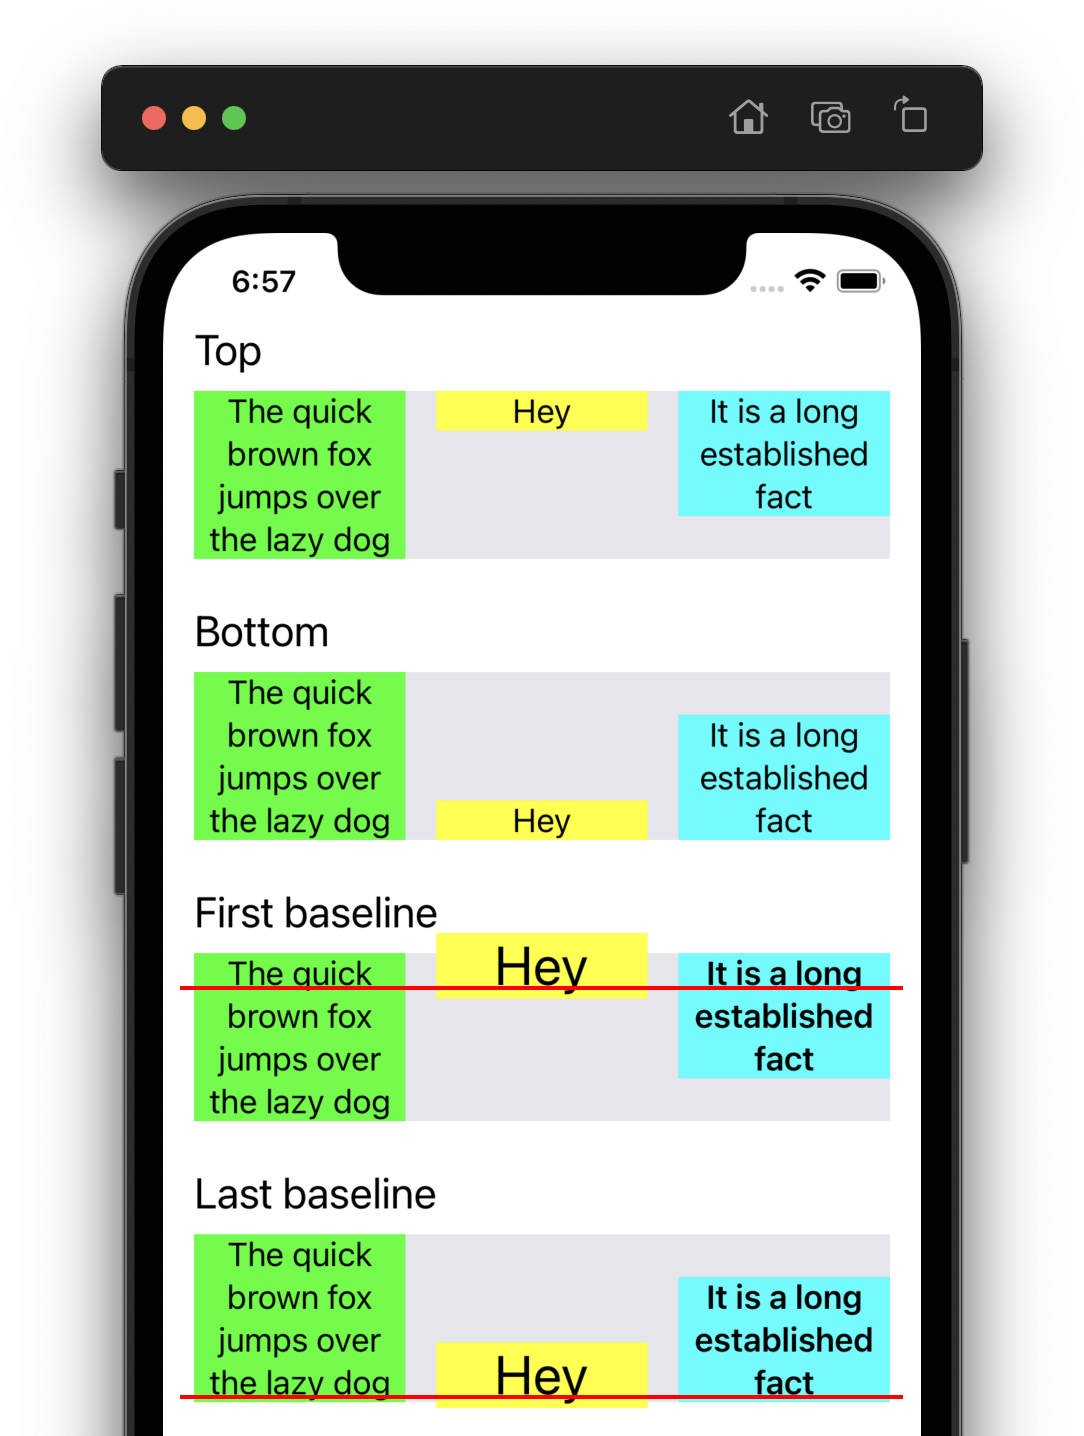
The remaining values are top, bottom, firstBaseline, lastBaseline. These alignments work with the horizontal axis only:
top— The views are aligned with the top of the stack view.bottom— The views are aligned with the bottom of the stack view.firstBaseline(buggy) — Aligns the views based on their first baseline.lastBaseline(buggy) — Aligns the views based on their last baseline.
Spacing
Spacing dictates the amount of space (in points) between the views along the stack view’s axis. Note that for equalSpacing and equalCentering distributions the spacing may be bigger so this value actually means the minimum space. For other distributions the value defines the exact space between each view.
stackView.spacing = 24The spacing can be customized for selected views in the stack by using the setCustomSpacing() method. For example, to increase the space that comes after the title label, we could write:
let titleLabel = UILabel()

stackView.setCustomSpacing(40, after: titleLabel)
To reset the spacing for the custom view back to whatever the spacing property is, we can use the UIStackView.spacingUseDefault constant:
stackView.setCustomSpacing(UIStackView.spacingUseDefault, after: titleLabel)Adding / removing arranged subviews
A plain UIView can contain other views (subviews), which can be accessed using the subviews property. Since UIStackView is a subclass of UIView, it inherits this property along with the addSubview() method. However, when using this method on a stack view, the subview will only be added to the view hierarchy, not the layout of the stack view. Stack view in fact has a separate arrangedSubviews property that contains all the subviews that are considered for the stack’s layout. To add or remove a view from the layout, we use these two specialized methods:
// Add the label to the end of the stack
stack.addArrangedSubview(titleLabel)

// Remove the label from the stack
stack.removeArrangedSubview(titleLabel)
Note that when removing a view from the stack using this method, it’s only removed from the list of arranged subviews but stays in the view hierarchy; it’s only removed from the stack view’s layout. In most situations we likely want to use the commonly used removeFromSuperview() method.
It’s also possible to insert an arranged subview at a specific index in the stack:
stack.addArrangedSubview(titleLabel)
stack.addArrangedSubview(contentLabel)

// Add subtitle after the title
stack.insertArrangedSubview(subtitleLabel, at: 1)
We can also hide a view using the isHidden property and the stack view will skip such views in its layout:
titleLabel.isHidden = trueExample #1 with stack views
As an excercise, let’s go back to the Sign Up Screen example and redo the main view using stack views instead of constraints.
Open up the project in Xcode and open the SignUpView.swift file. All the edits below are made in this file.
- Delete all the calls to
NSLayoutConstraint.activate(...)within thesetupView()method so that we are only initializing the views within that method. - Change the superclass of the
SignUpViewtoUIStackViewand remove the optionality from the required initializer:class SignUpView: UIStackView { ... required init(coder: NSCoder) { fatalError("init(coder:) has not been implemented") } ... } - Now since the
SignUpViewis a stack view itself, we can initialize its properties. We want the subviews arranged vertically with a default spacing of16. Let's put this code to the top of thesetupView()method:private func setupView() { self.translatesAutoresizingMaskIntoConstraints = false self.axis = .vertical self.spacing = 16 ... } - The problem we have now is that not all our views are stacked vertically. The toggle and terms label need to be arranged horizontally. Therefore we will create a new stack view just for these two views and add them to this new stack. Just above where we initialize the
toggleview, add the code for this horizontal stack view. We are using thecenteralignment to have the toggle and label centered vertically. Lastly, we'll replace theaddSubview()calls for thetoggleandtermsLabelwithaddArrangedSubview()call on the horizontal stack:let termsStack = UIStackView() termsStack.axis = .horizontal termsStack.alignment = .center termsStack.spacing = 16 self.addArrangedSubview(termsStack) let toggle = UISwitch() termsStack.addArrangedSubview(toggle) let termsLabel = UILabel() ... termsStack.addArrangedSubview(termsLabel) - Next we'll need to replace the remaining
addSubview()calls to make sure all the views appear in the main vertical stack:self.addArrangedSubview(titleLabel) ... self.addArrangedSubview(emailField) ... self.addArrangedSubview(passwordField) ... self.addArrangedSubview(button) - Finally we can add custom spacing after the
emailFieldandtermsStackviews to match our previous layout created using constraints. After the definion of the respective view, add thesetCustomSpacingcall:self.setCustomSpacing(8, after: emailField) ... self.setCustomSpacing(24, after: termsStack)
At this point we can build and run our project and see that we have successfully created the same layout without using a single constraint for our subviews! The instance of SignUpView is still constrained in the RootViewController as it should. However, building the main portion of the layout was arguably much easier than defining the constraints manually.
Last thing worth mentioning is that we can also delete the code that disables the autoresizing mask for each subview created in the setupView() method.
Source code
Complete source code for this and all the other examples is available on GitHub.
Where to next
- Intro
- Basics, Part One
- Basics, Part Two
- Xcode Setup
- Sign Up Screen
- Stack Views (reading now)
- Custom UIAlert
- Players Profile
- Twitter Timeline
- Twitter Profile
- Music Album